23 Dec 2024, 11:41

Emulating *BSD on ARM, Part 3: OpenBSD

This is part 3 of my blog post series about emulating BSD operating systems for 32-bit ARM with QEMU. Buckle up, today we will need to do an actual OS installation!

In OpenBSD/armv7, the miniroot image is an installer, so we also need a new empty drive image to install to. I recommend the qcow2 format, since it consumes only the space that is actually occupied. The 10G image created below is only 192 kilobytes initially. Here is how you create the root image:

qemu-img create -f qcow2 root.qcow2 10G

Next, we will need the pflash0.img and pflash1.img files created in the previous part.

As for the install image, there are several choices on the download page for OpenBSD 7.6/armv7. I went with miniroot-cubox-76.img but I don’t think it matters much which one you choose. They only differ in the platform-specific bootloader, and we will be booting from UEFI instead anyway.

Note that when booting, you might get an error message complaining that the size of the image is not a power of two. If that happens, just resize it to the next bigger one:

qemu-img resize miniroot-cubox-76.img 64M

Running the installer

Here is the command line to launch the installer then:

#!/bin/sh
qemu-system-arm \
	-M virt \
	-m 1024 \
	-nographic \
	-drive file=miniroot-cubox-76.img,format=raw \
	-drive file=root.qcow2,format=qcow2 \
	-drive file=pflash0.img,format=raw,if=pflash,readonly=on \
	-drive file=pflash1.img,format=raw,if=pflash \
	-device virtio-gpu-pci \
	-nic user,model=rtl8139

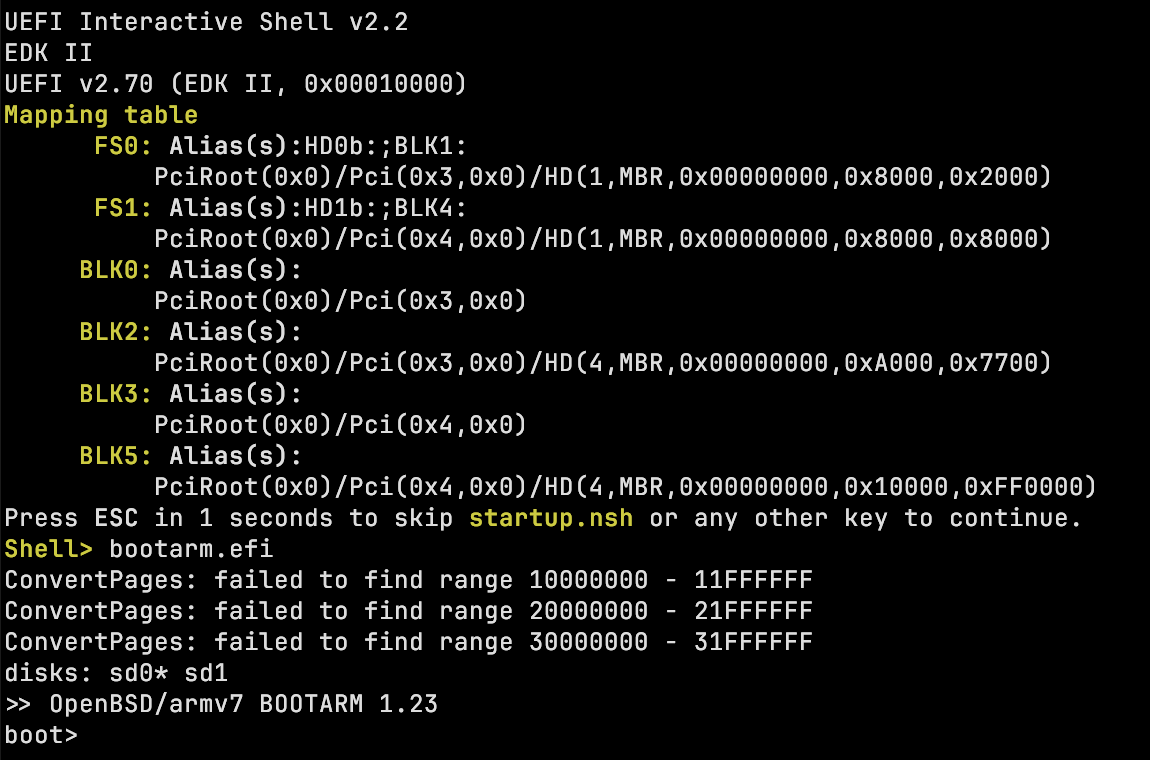
This time, we don’t have to type anything in the UEFI shell, it loads the bootloader directly, followed by the OpenBSD installer! At the boot> prompt, just press Enter.

Booting OpenBSD from UEFI

I won’t go over the steps to install OpenBSD itself. The only thing to keep in mind is that OpenBSD calls the boot image (the miniroot) sd0 and the root disk we created sd1, so be sure to install onto sd1.

As always, you can get out of QEMU and back to the terminal by “powering down”, e.g. running halt -p from a shell.

After installation

To boot your newly installed system, use the exact same QEMU command line as before, except that you remove the miniroot disk entry:

#!/bin/sh
qemu-system-arm \
	-M virt \
	-m 1024 \
	-nographic \
	-drive file=root.qcow2,format=qcow2 \
	-drive file=pflash0.img,format=raw,if=pflash,readonly=on \
	-drive file=pflash1.img,format=raw,if=pflash \
	-device virtio-gpu-pci \
	-nic user,model=rtl8139

A dmesg output of this freshly installed system can be found here. Notably, it looks like the virtio GPU is not supported, so I am not sure if you can get X11 to work.

When I did this installation, a short time after the OpenBSD 7.6 release, there were no binary packages avaiable for 32-bit ARM. But it looks like this has changed! There is a full set of packages in https://cdn.openbsd.org/pub/OpenBSD/7.6/packages/arm/ now, so that a command like

pkg_add vim

will just work. That’s nice!

Some thoughts on machine types and emulation

When I started fiddling with this, I tried to get qemu to emulate a real machine corresponding to one of the OpenBSD miniroot image. But that’s fairly limiting: these boards came with too little RAM, too slow storage, too few cores, all of it.

The nice property of an emulator like QEMU is that you can kind of build your own machine from scratch. The virt machine type is a generic thing that you can build out just like you want it. Want 8G of RAM? More cores? No worries!

You can add a bunch of virtio devices that are virtualization-aware; if one of them doesn’t work right, replace with some other emulated hardware. This is also why my command lines above use an rtl8139 network device instead of a virtio-net.

And for booting this contraption, using the EDKII UEFI firmware allows just booting a generic kernel and bootloader, which is supported almost everywhere.


And that concludes my series of blog posts on emulating ARM systems with QEMU. I hope you enjoyed it!

For reference, here are links to the other parts in the series:

11 Nov 2024, 20:52

Emulating *BSD on ARM, Part 2: FreeBSD

In Part 1 of this blog post series, I explained how I recently spent some time getting various BSD OSes to run on QEMU, for 32-bit ARM (ARMv7). This part deals with FreeBSD.

Spoiler: it was easier than the others.

I started by downloading an image from https://download.freebsd.org/releases/arm/armv7/ISO-IMAGES/. Mine was called FreeBSD-14.1-RELEASE-arm-armv7-GENERICSD.img.xz.

Preparing UEFI

Warner Losh has thankfully written a blog post about how to get it running in QEMU, which we are going to follow.

In the post, he explains that QEMU contains a version of Tianocore EDK2 for 32-bit ARM. If you don’t know about Tianocore, it is a UEFI firmware – similar to the BIOS of a PC, except it’s not built in. It abstracts away the low-level hardware bits and presents a standardized interface to the user and the bootloader.

So let’s create two virtual flash devices – one read-only containing EDK2, one r/w for any UEFI variables that should be saved. The read-only one can be shared across VMs, for the other one you should have a copy per VM.

#!bin/sh

dd if=/dev/zero of=pflash0.img bs=1m count=64
dd if=/dev/zero of=pflash1.img bs=1m count=64
dd if=/opt/pkg/share/qemu/edk2-arm-code.fd of=pflash0.img conv=notrunc
dd if=/opt/pkg/share/qemu/edk2-arm-vars.fd of=pflash1.img conv=notrunc

Here, QEMU is installed through pkgsrc in /opt/pkg. If your installation is in a different directory, you may have to adjust the paths.

Creating the QEMU startup script

QEMU is fully configured through command-line options. Thus, the command lines are long and difficult to get just right. QEMU command lines are typically passed on from user to user, like a cargo cult. Here is mine for FreeBSD-ARM:

#!/bin/sh

qemu-system-arm \
	-M virt \
	-m 4096 \
	-drive file=pflash0.img,format=raw,if=pflash,readonly=on \
	-drive file=pflash1.img,format=raw,if=pflash \
	-drive file=FreeBSD-14.1-RELEASE-arm-armv7-GENERICSD.img,format=raw,if=virtio,cache=writethrough \
	-device virtio-net,netdev=net0,mac="52:54:00:12:34:55" \
	-netdev type=user,id=net0 \
	-device virtio-gpu-pci \
	-usb -device nec-usb-xhci \
	-device usb-kbd -device usb-mouse \
	-nographic

EFI wrangling

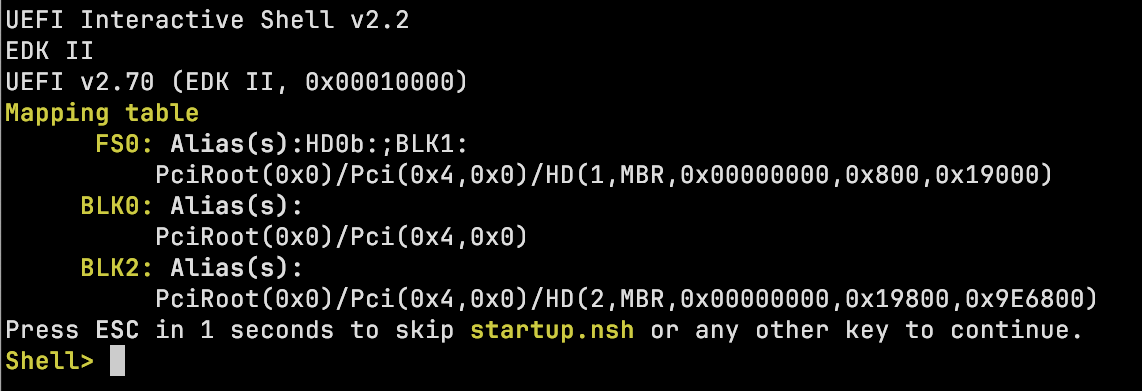
Upon launch, we get a UEFI shell prompt:

Welcome to the UEFI shell! Remember DOS?

The EFI shell (here is a primer from Intel) is strangely reminiscent of a DOS prompt. First, set the current device by typing

fs0:

You can now explore the contents with dir and change directories with cd. To boot, run this command:

EFI\boot\bootarm

To get this setting to stick in future reboots, create a startup.nsh file – the EFI equivalent to autoexec.bat – on the running system, as root:

echo 'fs0:\efi\boot\bootarm' > /boot/efi/startup.nsh

That’s it!

The FreeBSD/arm system from the image is immediately ready for action! No installation is needed. I was able to install some binary packages for armv7 simply by running

pkg update
pkg install python311 go123

All in all, this FreeBSD experience was about as frictionless as it gets, once you have cleared the hurdle of getting QEMU to run with the right settings.

You can quit the emulator and go back to the host shell by running halt -p as root.

In the next installment, we are going to install OpenBSD/armv7.

28 Oct 2024, 20:30

Emulating *BSD on ARM, Part 1: Introduction

In my copious spare time, I maintain the Go CI system for certain platforms. These days, Go uses LUCI, the same CI pipeline that Chromium is using.

My current rabbit hole is making the “swarming bot” work on NetBSD/arm – that’s 32-bit ARM, not aarch64. When building Go code for 32-bit ARM, the GOARM environment variable can be set to the instruction set version, i.e. GOARM=6 (ARMv6, the default) and GOARM=7 (ARMv7). One of the things that ARMv7 has that v6 doesn’t is atomic synchronisation instructions. At least on BSD systems, Go needs those for multi-core systems (which is more or less all systems these days). Thus, ARMv6 Go binaries exit on startup if run on a system with multiple cores.

The Chromium CI system used to only support ARMv6 – they call it armv6l, for little-endian – not ARMv7. This meant that the whole thing was pretty much broken on BSD on ARM.

So I added code for netbsd-armv7l in the LUCI swarming bot. Again, that’s the LUCI platform name, Go calls this netbsd-arm. The feedback I got was basically “Great, now can you also do FreeBSD and OpenBSD?”

Time to install some VMs to find out what they use as uname, or rather what Python’s platform module returns for them. It turns out the three OSes are wildly inconsistent in this!

As a spoiler, here is what I found out:

OS platform.machine() platform.processor()
FreeBSD/armv7 arm armv7
OpenBSD/armv7 armv7 arm
NetBSD/evbarm evbarm earmv7hf

In the next posts, I will detail how I got these platforms to run in qemu.

27 Aug 2024, 11:46

The code is not enough

In my job, I read a lot of code. I read more code than I write. I suppose that’s true for many engineers at the senior level or above.

For instance, a new piece of code integrates with a library, or with another code base, and I want to understand how the integration works. Or I am the supplier of the infrastructure/library/framework and I need to debug someone’s (mis-)use.

  • Why does this not compile?
  • Why does it compile but then crashes on startup with a cryptic error message?
  • Why does it seem to work but then all requests return the same error?

Configuration

Code is nothing without the corresponding configuration, particularly when you are looking at builds or deployments.

For instance, the code may contain a bunch of #ifdef preprocessor macros. Which of the paths is taken and which one is not depends on the settings of the build. So to understand what’s happening, you need the actual build settings. In the case of autotools, that’s config.status – which also contains a ton of noise, but you can find the list of variables easily enough. Or you look at config.h, which specifically has preprocessor defines.

But that’s not the only type of configuration. When a program is running, its behavior changes based on command-line flags, or the contents of a configuration file. Or some settings (like secrets) are passed in from an environment variable, or looked up in some sort of secret storage.

Sometimes, command-line flags contain a whole configuration message, e.g. a bit of JSON as the flag value. I have seen this in libraries that control authentication requirements – i.e. whether a handler is public, or needs a password, or needs some kind of strong user identity. If you are investigating why no one seems to be able to call your HTTP endpoint, that’s where you need to start.

What and why

The point I was trying to make though is this: when reading code, the two main questions are what and why:

  1. What is the code doing?
  2. Why is it doing it?

I found that you need to understand both aspects to understand some code. As for #1, sure you can start looking at source files in less but you can do better.

I personally find working cross-references super useful. As an example, you see that some code calls AddPeer, and you want to know what it does, so you jump to its definition. That particular function adds an entry to a table. But what uses this table? So you highlight that identifier and look for usages.

Getting cross-references within a code base is not hard. For C code, you can use ctags, which is decades old. Both vim and emacs support these.

The modern approach is an LSP server interacting with your text editor. Neovim for example has LSP support built in, as does VS Code. There are LSP implementations for all sorts of programming languages. For instance, for Go code, there is the excellent gopls.

The second question, the why, is best answered from the history of the code. It is vastly better to read the code with history available – e.g. looking at a VCS checkout rather than an extracted release tarball.

When reading a bit of code, wondering why it is doing a particular thing, you can start from the “blame” or “annotate” layer. Some folks have called the existence of this layer a mistake – I disagree! Here is an example from the NetBSD kernel, an excerpt of the result of running cvs annotate sys/dev/pci/pcireg.h:

1.1          (mycroft  09-Aug-94): /*
1.60         (jakllsch 17-Aug-09):  * Size of each function's configuration space.
1.60         (jakllsch 17-Aug-09):  */
1.60         (jakllsch 17-Aug-09):
1.124        (msaitoh  28-Mar-17): #define	PCI_CONF_SIZE		0x100
1.124        (msaitoh  28-Mar-17): #define	PCI_EXTCONF_SIZE	0x1000
1.60         (jakllsch 17-Aug-09):
1.60         (jakllsch 17-Aug-09): /*
1.1          (mycroft  09-Aug-94):  * Device identification register; contains a vendor ID and a device ID.
1.1          (mycroft  09-Aug-94):  */
1.124        (msaitoh  28-Mar-17): #define	PCI_ID_REG		0x00
1.1          (mycroft  09-Aug-94):
1.3          (cgd      18-Jun-95): typedef u_int16_t pci_vendor_id_t;
1.3          (cgd      18-Jun-95): typedef u_int16_t pci_product_id_t;

It shows who last touched a line and when. You see that adjacent lines might have very different dates!

From this, you can go back to the commit that made the change, look at its log message and the other files that are part of the same commit. If your commit log messages are good, they tell a story. They give the context needed to understand the “why”.

Tooling

Combining cross-references and a history panel is a great way to read and understand code. Many IDE developers understand this and offer a view just like this.

An exemplary UI for this approach is Google Code Search. For example, look at mutex.go from the Go standard library. All identifiers are clickable and serve as cross-references. The “History” panel at the bottom offers all the commits where something was changed.

A similar web UI (but open source) is OpenGrok. Look at the pcireg.h example in NXR, the NetBSD OpenGrok instance. The file history is a separate page but that works too. What’s nice about OpenGrok is clicking on a revision in this view shows the blame layer at that version, so you can see who edited the line before.

These tools really provide a lot of added value when reading and understanding code. Use them.

07 May 2024, 22:21

Fedora Update: btrfs self-destruct

A while ago, I installed Fedora Asahi Remix on my M2 MacBook Air, and I was very positive about it. So positive, in fact, that I ended up making it the default partition in the bootloader. I haven’t used macOS in weeks. But then, a few days ago, something weird happened:

In the middle of some development work, running cvs update on the pkgsrc repository, the screen suddenly filled with a bunch of “read-only file system” errors. It turned out that both / and /home had remounted themselves read-only, without my intervention.

Running journalctl --system showed some warning messages in an alarming orange-red: btrfs, the file system that the system was running from, had found inconsistencies and had chosen to remount itself read-only. Now what?

I tried running btrfsck /dev/nvme0n1p6. Now, by default, btrfsck will only check, not repair. But even the check aborted with an error about “errors found in FS roots”.

From my BSD experience, I thought booting into single-user mode and running fsck with a r/o root file system would do the trick. A quick init S later … it turns out that you can only get a shell in single-user mode if you have a root password set. By default, logins as root are forbidden, even in single-user mode. But good luck setting a password while / is read-only!

After several reboots, I got the system to work r/w for a while, so I could set a root password. So within single-user mode, I ran

# btrfsck --repair --force /dev/nvme0n1p6

Decent idea, but like the check before, the repair option also aborted with an error, saying “parent transid verify failed”. According to some random search results, this means that the file system is likely damaged beyond repair. Or, as @ParadeGrotesque aptly remarked on Mastodon:

It’s dead, Jim.

Don’t blame me, I don’t make the rules.

So in the end, I managed to back up my home directory with Restic (good thing I had restic installed before!), then wiped the entire installation and re-installed. Bummer.

More on btrfs

Why is btrfs the default file system in the first place? The Fedora Asahi Remix installer doesn’t even let you choose the file system type! I wish it did!

The way I understand btrfs is that the developers are aiming for a feature set on par with ZFS, except fully under the GPL and more “Linux-native” – ZFS was originally developed for Solaris, after all, and its licensing situation is at least a bit dodgy.

btrfs has long had a reputation of playing fast and loose with your data. In the early days, I heard several stories of spectacularly losing data. People have assured me that those days are over, and that btrfs is a reliable system these days.

Honestly, this experience has shown me that btrfs, even today, is anything but reliable. The corruption I witnessed is surely not due to broken hardware. The hardware is absolutely fine.

I suspect that the root cause is probably several unclean shutdowns. Asahi Linux does have an unfortunate bug where it will consume too much battery when in standby, so I ran out of battery several times. And, to be fair, finding the corruption and going read-only is sensible. But what I find absolutely infuriating is the utter inability of its fsck to actually repair anything. The fs roots are damaged, so what? There are incorrect transids, so what? Telling me my FS is fucked and I need to recreate it from scratch is not useful!

As it is, what happened with btrfs made me recall the previous low point of Linux file systems: years ago, I ran a file server with ReiserFS in production. It corrupted itself to such a degree that reiserfsck kept segfaulting. We lost so much user data. Good times.

31 Mar 2024, 20:32

The XZ Backdoor

Over the Easter weekend 2024, there was a big kerfuffle around a compression tool named xz. Honestly, the story is so amazing that it could be a gripping novel. In fact, what happened is not dissimilar to the book $ git commit murder My Michael Warren Lucas.

A PostgreSQL developer, Andres Freund, was running some benchmarks and trying to reduce the noise from other programs on the system. While doing so, he noticed that sshd would take more CPU than expected during logins, for about 0.5 seconds at a time.

Side note: The reason that this came up at all is that any system exposed to the internet gets regular failed login attempts via ssh, from potential attackers and security scanners of some sort.

So Andres starts looking into where the CPU time is spent and discovers that most of it is in a part of liblzma (the compression format library) and not covered by a symbol – i.e. without an indication in which function it is. This is very suspect. Digging further, it turns out that sshd is backdoored through the installation of xz version 5.6.0 or 5.6.1!

At this point, I highly recommend heading over to https://www.openwall.com/lists/oss-security/2024/03/29/4 and reading Andres’ original investigation posting. Below, I want to resume some more salient points around this story.

Why does OpenSSH even depend on xz?

Normally, it doesn’t, however several Linux distributions patch sshd to integrate systemd notifications. The systemd library to do that also happens to link against liblzma from the xz project. So perhaps the folks complaining about how systemd is so pervasive in modern Linux systems do have a point.

Who wrote the backdoor?

The malicious code has not been written by the original author and maintainer of xz, Lasse Collin. In fact, he appears to be the victim here.

The backdoor was inserted by a second xz maintainer named Jia Tan, who joined the project several years ago. The circumstances of him joining are a story that happens all over open source projects:

At some point, the main development of xz was more or less done. As lcamtuf argued, ongoing maintenance of a stable project “is as interesting as watching paint dry”. So I imagine Lasse struggling with motivation, then someone coming along and offering to become the co-maintainer. They show up with some patches ready to merge. At the same time, several people put pressure on Lasse, saying that “patches sit forever in the queue”, that they are doing a bad job and that this person should just be admitted.

Note that this was years before this backdoor.

They then do the following:

  • Jia Tan creates https://github.com/tukaani-project containing Lasse and themselves. The original xz code was hosted off GitHub on git.tukaani.org.
  • The homepage moves from Lasse’s server to a subdomain hosted on GitHub Pages, so that Jia Tan has full control over what’s on the page.
  • A workaround for a Valgrind failure is added to various distributions. Apparently, the Valgrind failure is caused by code added to later support the backdoor.
  • Jia Tan adds plenty of test files (binary archives) with innocent-sounding names to the repo. Curiously, some of them are not actually used in tests.
  • Jia Tan creates the official release tarballs on their machine.

The last two points are important for how the backdoor is hidden.

xz versions 5.6.0 and 5.6.1, both containing the backdoor, are released in late March 2024, apparently while Lasse Collin is on vacation.

How is the backdoor hidden?

The payload is effectively contained in some of the binary test archives added to the repository before. But the way they are enabled is amazingly subtle.

In open source projects using Autotools, it is common to not check in generated files (like the configure script) to the repository. After all, they can be generated at any time, right? So what happens is that the maintainer of the code (the perpetrator in this case) checks out the source at a certain tag, runs autoreconf and creates the release archive from the result (e.g. using make dist, which is part of automake). So whatever changes they do to their local copies of autoconf and/or its macros is not checked in to source control! If you look into the git repo, the code enabling the backdoor is not there at all!

What does the backdoor do?

On a Linux x86 system (and only on Linux x86), it hooks up into the signature verification routines used when checking the credentials of someone trying to log in via ssh. The exact way of working is still not fully understood as of the time of this article. According to preliminary analysis by Filippo Valsorda, the backdoor becomes active when the login attempt contains a certain client key (I was not even aware that a client key is sent in ssh logins) and runs some code by calling system. So it appears to be Remote Code Execution, a Pre-Auth Bypass, or both.

In this context, it is probably not a coincidence that some folks saw a much larger number of failed ssh login attempts over the internet:

xz 5.6.0 was released 2024-02-24, around one month ago, and it contained a backdoor.

[…]

There has been an incredible amount of SSH attacks on my server since early 2024. To give you an idea:

root@udon:~# grep -ic 2024 /etc/hosts.deny
5406

root@udon:~# grep -ic 2023 /etc/hosts.deny
763

Who is Jia Tan?

In short, we don’t know. It is probably a fake identity, just like the sock puppet accounts that were used to pressure Lasse to admit Jia into the project.

The back story is that they are Chinese and living in California. There is some speculation that they were legitimate and a second person took over their identity. But this is not confirmed, and I think it is unlikely.

Jia Tan’s GitHub account is still active, though the xz-related repos have been blocked. This does not make it easier to follow along the technical write-ups, or to check out the source for ourselves.

Jia also made 9 commits into private repositories in the last month. I wonder what those are?

In the meantime, Lasse found at least one other malicious commit in the xz source, disabling the use of Landlock sandboxing on Linux. Look at that diff and think about whether you would have spotted this in code review!

Jia also made suspicious commits to other projects, such as libarchive. Again, some of this suspicion may be overblown, but we don’t know.

Would SBOM have prevented this?

Haha lol no.

These were normal-looking releases, uploaded and signed by the regular release manager. If anything, it is helpful to be aware that a larger product contains a version of xz with the backdoor.

What are the consequences?

This could be a watershed moment for open source development. Open source development is currently a high-trust environment, and I fear that suspicion about this case is going to color all sorts of future interactions.

The thing is, all the interactions that Jia Tan had look absolutely legit and standard for open source. It is completely normal that someone who you never met shows up and offers some help and patches. Maybe you meet them years later at FOSDEM, or something. Maybe you never do.

For instance, in NetBSD, there are dozens of people who contribute under pseudonyms at this very moment. To become a developer, we require that another developer meet you in person and sign your PGP key. Maybe that’s a good idea after all.

But for instance, multiple times, I have shown up in some other open source project with a fully formed patch, saying “Here is some code to support my OS or my architecture. You probably cannot verify it as you don’t have this machine. Please apply it, I promise it’s fine.” Until now, I assumed that they would do just that, and was annoyed when they didn’t. But now? They don’t know if I am trying to insert a backdoor.

In the end, this is probably going to introduce more friction and more suspicion of contributors’ motivations into the distributed, open development process. This is bad news for all users of Free software. I would hate it if this destroys the trust-first (you might say naive) culture in open source development.

But let me also offer two more hopeful takes.

  • Diversity works. The backdoor targets the largest majority platform for servers: Linux, with systemd, on x86. Running NetBSD or FreeBSD, or perhaps another architecture such as ARM, prevents the attack from working. So by virtue of being on a less common platform, you can lower your risk. This is a basic economic argument: just like other closed source vendors (hah!), exploit writers primarily target the majority.
  • Finally, the open source community did not actually do too bad in this! Sure, it was found by a stroke of pure luck. But the malicious code had been in the wild for only about a month. And it had not made it into long-term support releases of major distributions, where it would have made it into a ton of server systems. Compared to the lead time for this attach of 3-4 years, this ended up not being a very successful operation by whichever organization is behind this. So in sum, we got away okay this time.

03 Feb 2024, 10:21

Fedora Asahi Remix

I have been following Asahi Linux for a while. Linux for my MacBook Air M2 – sure, why not? But I wasn’t particularly interested in a distribution based on Arch Linux.

In late 2023, the Asahi folks presented a new distro that they called Fedora Asahi Remix. The promise is to combine the ground-breaking Kernel development of Asahi with the polish of Fedora Linux. I thought I would give it a go.

tl;dr for the rest of this post: the installer feels very hackish but once installed, it’s great!

Installation

The installer follows the infamous curl | sudo bash paradigm. I don’t trust this sort of thing so I took a look at what is downloaded: it is mostly a launcher for the rest of the installation, which is also a collection of shell scripts. It turns out that Fedora has a graphical installer, which appears very late in the installation routine, for about two minutes, the rest happens in the terminal.

The first thing the installer does is shrink the macOS partition to make space. You choose how much to give it – I chose a roughly 60:40 split. Aside: technically, it’s not a partition but more of a pool, as APFS is similar to ZFS in its interface.

Step number two is really the special sauce of Asahi Linux: installing a UEFI environment, the U-Boot bootloader and making it bootable from the boot selector screen, including some firmware setting changes.

Unlike a PC, an ARM Mac has a specialized firmware which is made to boot macOS and nothing else. On other types of ARM machines such as the Pinebook Pro, U-Boot (the Universal Bootloader) takes care of running the OS. On the Mac, Asahi sets some firmware variables that allow this behavior as well. The Linux boot partition needs to be “blessed”.

Here is where the most hackish part of the installation happens: the installer reboots into the macOS recovery system. Before it does that, it prints instructions asking you to run a series of commands inside the rescue system and accept the warnings that it prints. I don’t think you can brick your machine if you do it wrong but I would not give this to someone who is not good at this computer thing.

Scary installer message

The next reboot is the first time that the machine is actually running a Linux kernel. The graphical Fedora installer appears and does a bit of configuration. That’s it.

After installation, my system still boots into macOS by default. To boot Fedora, I hold the power button in the first boot phase, so that the firmware shows the boot selector screen. Then, the options are macOS, Fedora and the macOS rescue system.

Using the system

This my first time using Fedora. The only RPM-based distro that I used in the past was SuSE, about 25 years ago. But from afar, Fedora always seemed to be fairly polished. So I was curious.

There are several flavors of desktops that can be selected in the installer: KDE, GNOME, or no desktop / do-it-yourself. The documentation says that KDE is the most polished option, so I went with KDE Plasma. Again, many years have passed since I last used KDE.

KDE still feels cluttered to me, as if its designers think what power users want is lots of buttons in lots of toolbars everywhere. But luckily, you can disable them and gain some space.

On the other hand, the UI in general (based on Wayland) looks gorgeous on the 2x Hi-DPI screen of the MacBook Air! I have struggled to configure Hi-DPI X11 desktops properly in the past (both on NetBSD and Debian), but Fedora has really nailed the setup out of the box. Kudos!

Another thing I noticed is the amount of updates. Fedora’s equivalent to apt used to be called yum and is now dnf, though there is a symlink – yum update still works. Contrary to apt, dnf update fetches package descriptions and updates packages.

New updates are added all the time. As I quipped on Mastodon the other day:

I have not booted this Fedora system in a few days, so 750 MB of updates it is

This was literally the amount of updates I had at one point. I am not sure if this is good or bad. I guess it’s not a big deal unless you are concerned about the amount of SSD writes, or the speed of your internet connection (FTTH FTW!).

Installing more software

  • Bootstrapping pkgsrc went fine, so that’s another 35000 packages at my fingertips :)
  • I tried installing Steam but it seems like there are no Linux/aarch64 packages available. This works better on macOS with the Game Development kit doing some kind of ad-hoc x86 emulation, though I was able to make it work exactly once and it stopped working after a reboot.
  • I wanted Visual Studio Code (don’t judge me!), and the graphical software catalog proposed a Flatpak version. As I quickly discovered, the VS Code Flatpak is useless, at least for my purposes. I suppose you can make it work with a generous sprinkling of Dev Containers, but I don’t want to.

Hardware support

Almost everything works! I cannot overstate what a big deal this is, and I expected the experience to be much less refined in that regard. The function keys do the right thing, you can control brightness and keyboard backlight, suspend/resume works perfectly, etc.

Using Fedora on this hardware feels super snappy. File system operations are shockingly fast. Compiling software seems much faster than on macOS, though I did not benchmark this. My hunch is that the process management is a bit slower in macOS, due to the Mach / XNU underpinnings. 3D graphics performance is good too.

I only found two minor caveats in my testing:

  • External displays over USB-C do not work, which means I cannot do my conference presentation from Linux. This is a known limitation.
  • The system uses more power while it is suspended. In macOS, you can close the lid and have almost no battery use during the time. On Linux, the battery is empty after a few days.
  • In general, battery life is a bit worse but still amazing. This may be due to me running more demanding workloads while on Linux. I did not do a scientific comparison.

Conclusion

I really like it!

I might find myself using Linux as my main OS on the MacBook – though in the last couple of days, I have been using macOS more, maybe half the time. Still, I had not expected this distro to be so good. And I had not expected that I would like it so much.

So is 2024 finally the year of Linux on the desktop? I guess for me it is.

14 Jan 2024, 18:47

The VS Code Flatpak is useless

I installed Fedora 39 the other day. (More on that in one of the next posts.) It has a nifty software installer thing named “Discover”. When I typed “Visual Studio Code” into the search box, it dutifully installed VS Code. As a Flatpak.

This was the first time I interacted with Flatpak, and it did not go well.

Aside: Why VS Code

I want to use VS Code for editing Go code, with gopls, since it provides a really good integration. It turns out that a majority of Go developers use VS Code, so the language server integration is well tested and complete. In short, it’s the well-lit path.

Specifically for myself, there is a second reason: At work, we use a bespoke web-based IDE based on VS Code, with all sorts of integrations to make developers more productive. I have gotten very familiar with this setup, so it makes sense for me to write open source code in this way too and benefit from the muscle memory, so to speak.

There is a philosophical argument that you should avoid VS Code because it is controlled by Microsoft, and it gives Microsoft a certain leverage over the open source Go ecosystem. For what it’s worth, the same argument applies to using GitHub: Such a large percentage of open source code is developed on GitHub these days, and Microsoft could “enshittify” it at any moment if they wanted to. But for both of these, I personally think that it would be easily doable to switch away from them to something free – for instance, move over to Neovim’s LSP integration. In the meantime, I remain pragmatic and use what works for me.

Why not Flatpak

Back to Fedora. I installed Go and gopls from pkgsrc, as you do. However, the Go plugin tells me that it cannot find gopls, or any of the toolchain. Why!? Issue golang/vscode-go#263 has a bunch of people rather confused about this failure mode.

Ultimately, it comes down to this: Flatpaks run isolated from the host OS, which is fundamentally incompatible with developing code in an IDE. Despite the allowlist for access to OS paths, there is no way to allow access to /usr, /lib, etc. This is fundamental to the Flatpak security model. The app runs in a container that is cordoned off from the main OS.

But an IDE for developing native code does need host OS access! It needs to run a build tool, toolchain, native tools, etc. Not only does the VS Code Flatpak not allow doing this, it also does not provide an easy way to install a toolchain into the container. Never mind that I do not want a second copy of my tools. An IDE also needs to be able to run a shell in a terminal.

At this point, I am left wondering: who can actually use this Flatpak, if native compilation is all but impossible? Is it made for frontend devs writing only JS, with all the tooling in JS as well?

Fixes

I am also wondering why the Flatpak is the default type of installation for VS Code on Fedora, given that Upstream has a repository of perfectly fine RPM packages. See https://code.visualstudio.com/docs/setup/linux#_rhel-fedora-and-centos-based-distributions.

The other container-like option would be a Snap, if you are into additional packaging systems on your distro. You can install the Snap in “classic” mode, where it has file system access:

sudo snap install --classic code

My choice has been the native package, and now everything is running fine.

26 Nov 2023, 15:08

Building a NetBSD ramdisk kernel

When I used OpenBSD, I was a big fan of bsd.rd: a kernel that includes a root file system with an installer and a few tools. When I invariably did something bad to my root file system, I could use that to repair things. bsd.rd is also helpful for OS updates. And there is only a single file involved.

On NetBSD however, there is usually no netbsd.rd kernel installed, or even available by default. The facility is there, it’s just not standard. To be fair, there are a number of architectures that use kernels with a ramdisk for installation.

Recently, I have been toying with NetBSD on an Orange Pi 5. This is a 64-bit ARM board, using the evbarm-aarch64 architecture. I am booting from an SD card (details in a followup post) but once booted, the kernel does not see the card any more, only the NVMe SSD. So my thoughts went back to bsd.rd and I decided that I want one!

It turns out that there are two ways of getting a kernel with a ramdisk:

  1. Building the ramdisk image into the kernel itself, bsd.rd-style. This is called an “instkernel” in NetBSD terminology.
  2. A loadable kernel module, miniroot.kmod. The modules.tar.xz set contains an “empty” miniroot module, to which you can apparently add your own image.

I was unable to make #2 work, so I will only be talking about #1 here.

How to create a NetBSD ramdisk kernel

For the ramdisk image, you can use a pre-built “daily” image, which is available at http://nycdn.netbsd.org/pub/NetBSD-daily/HEAD/latest/evbarm-aarch64/installation/ramdisk/ as ramdisk.fs. Its size is 3072 KiB. Keep that number in mind for later.

For the next steps, you need a NetBSD source tree. The default location is /usr/src but any other location works just as well.

The Orange Pi 5 uses the GENERIC64 kernel configuration but there is no “install” variant. So you need to add a new configuration file, sys/arch/evbarm/conf/GENERIC64_INSTALL, with these contents:

include "arch/evbarm/conf/GENERIC64"

no options MEMORY_DISK_DYNAMIC
options MEMORY_DISK_IS_ROOT
options MEMORY_DISK_RBFLAGS=RB_SINGLE
options MEMORY_DISK_ROOT_SIZE=6144

This disables the dynamic ramdisk size and use a fixed size of 6144 sectors x 512 bytes (= 3072 KiB) instead. It also sets the ramdisk as the root filesystem and defaults to single-user mode.

Now let’s build the kernel. I did this on a Mac but any OS would do:

$ cd /usr/src
$ ./build.sh -O /Volumes/obj/ -m evbarm64 -N1 -j 7 -U tools
$ ./build.sh -O /Volumes/obj/ -m evbarm64 -N1 -j 7 -U -u kernel=GENERIC64_INSTALL

Side note: the obj directory needs to be on a case-sensitive filesystem. On a Mac, you can create a case-sensitive APFS dataset named obj, which is mounted under /Volumes/obj.

Now the magic bit, adding the image into the kernel:

$ /Volumes/obj/tools/mdsetimage/mdsetimage -v /Volumes/obj/sys/arch/evbarm/compile/GENERIC64_INSTALL/netbsd ~/Downloads/ramdisk.fs
mapped /Volumes/obj/sys/arch/evbarm/compile/GENERIC64_INSTALL/netbsd
got symbols from /Volumes/obj/sys/arch/evbarm/compile/GENERIC64_INSTALL/netbsd
root @ 0xc6e328/3145728
copying image /Users/bsiegert/Downloads/ramdisk.fs into /Volumes/obj/sys/arch/evbarm/compile/GENERIC64_INSTALL/netbsd (3145728 bytes)
done copying image
exiting

Now you can copy the sys/arch/evbarm/compile/GENERIC64_INSTALL/netbsd file to the SD card and boot from it. This boots into the NetBSD installer, which also has a (limited) shell available.

In my case, I was able to install the system to the SSD. Success! 🎉

14 Oct 2023, 21:23

Talk about the Basics

Whenever I send around a Call for Papers for an open source conference, some people reply something like

Unfortunately, I don’t have anything to present right now. My work on XYZ is simply not far enough along.

Or similar. However, this does not matter.

I’ll let you in on a secret: When I was in academia, when someone was talking about their results at a conference, I mostly did not give a shit about the results themselves. (Unless I was working on something narrowly related, which was rare.)

Instead, what I was really interested in was the Intro and the Conclusion. Why did you do this research? What is the bigger picture? What have you learned?

What to talk about in an (open source) conference

The idea for this post came to me after EuroBSDCon 2023, where this type of conversation happened more than once, with different NetBSD and other developers. (I hung out mainly with the NetBSD crowd, as expected.)

Many of the successful presentations in the conference weren’t all that much about own work, the work of developing some driver, subsystem or whatever. They were about cool stuff they do with the OS. What cool stuff can I, the person watching your talk, do with this OS, or with some other OS? What are you using your operating system, or programming language, or whatever, for? Surely you are using it for something? So you are running some web services behind a firewall? You could talk about that! Explain how, say, npf in NetBSD helps you with that.

You are fiddling with your OS on a tiny single-board computer? Bring it into the talk, connect it to your laptop and boot it live!

Example: OccamBSD

One of the more inspiring talks that I watched at EuroBSDCon 2023 was the excellent Michael Dexter explaining OccamBSD. At its core, OccamBSD is a minimal FreeBSD – you build the world and disable all the knobs that can be disabled, so you get a system that’s minimal in size. Why?

  • as a study object, to take apart and see what you can do without
  • for jails, where you don’t need a mailer daemon to run your webserver

And more. I thought the idea was neat, and I am now experimenting with doing something similar on NetBSD.

So what, I hear you object, but this was presenting the author’s own, finished development work! Well yeah. But development work is never finished. Don’t be afraid of showing things which are not quite ready for prime time. You might find people that like the idea and want to help you.

Example: “NetBSD, not just for Toasters”

At FOSDEM 2020, I gave a somewhat generic talk introducing NetBSD and pkgsrc. Its title was “NetBSD: Not just for Toasters”. To be honest, when I started writing the talk, I was a bit worried that it would be too generic and hence boring.

But to my great surprise, this was my most successful FOSDEM talk ever. The hall was packed, and I had about an hour’s worth of audience questions in the hallway outside. It turns out that people who are not from the BSD community were coming in to this talk to find out what cool things your can do with this, just as I alluded to above.

And I did have some cool things in there, mentioning various emulation and cloud support layers, plus some fun ARM hardware that you can run NetBSD on. And clearly, even if you are never going to try this OS, maybe you got inspired to buy a Pinebook Pro and use an open hardware laptop?

Conclusion

It is hard to judge from your own perspective how interesting your topic will be for the audience. You, as the author, tend to overindex on your own work and take the context in which your work happens totally for granted. Yet, the audience perspective is very different.

  • The audience is looking for ideas and inspiration.
  • The audience might be looking for a cause that they can join and that sounds fun. It doesn’t have to be finished.
  • Even if they will not use the exact combination of things you present, they are looking for an aspect that translates to their own world.

I hope this gives you some ideas for when you are feeling writer’s block when the next call for papers arrives.

PS: The Twitter button is gone from this blog.