My desktop PC has two NVMe drives, one for Windows and one for NetBSD. With Steam game footprints being what they are, the Windows one (256 GB) has been perpetually overfull, so it was time for something bigger.
At the same time, I had bought an NVMe daughter board for my Pinebook Pro. My impression with the PBP is that the I/O performance of the eMMC module is holding it back, so I am excited to give it fast storage :)
This presents an opportunity to change over the drives in a “rochade”:
- Remove the NetBSD drive, add empty drive.
- Add GRUB bootloader, copy over Windows installation.
- Move old SSD into the laptop, re-add NetBSD drive.
What’s nice about this is that at any point in time, one can roll back the process, so the chance of losing data is small.
This post is about some things I learned in the process.
Moving Windows 10 to a new drive
Some Googling told me that the simplest way of moving an existing Windows 10
installation to a new drive is something called System Image Restore.
First, you need to create an image of the existing C: drive onto yet
another storage medium – an external hard drive in my case. Then, you
boot from a rescue USB stick, such as the one from the retail Windows
packaging, and restore the image.
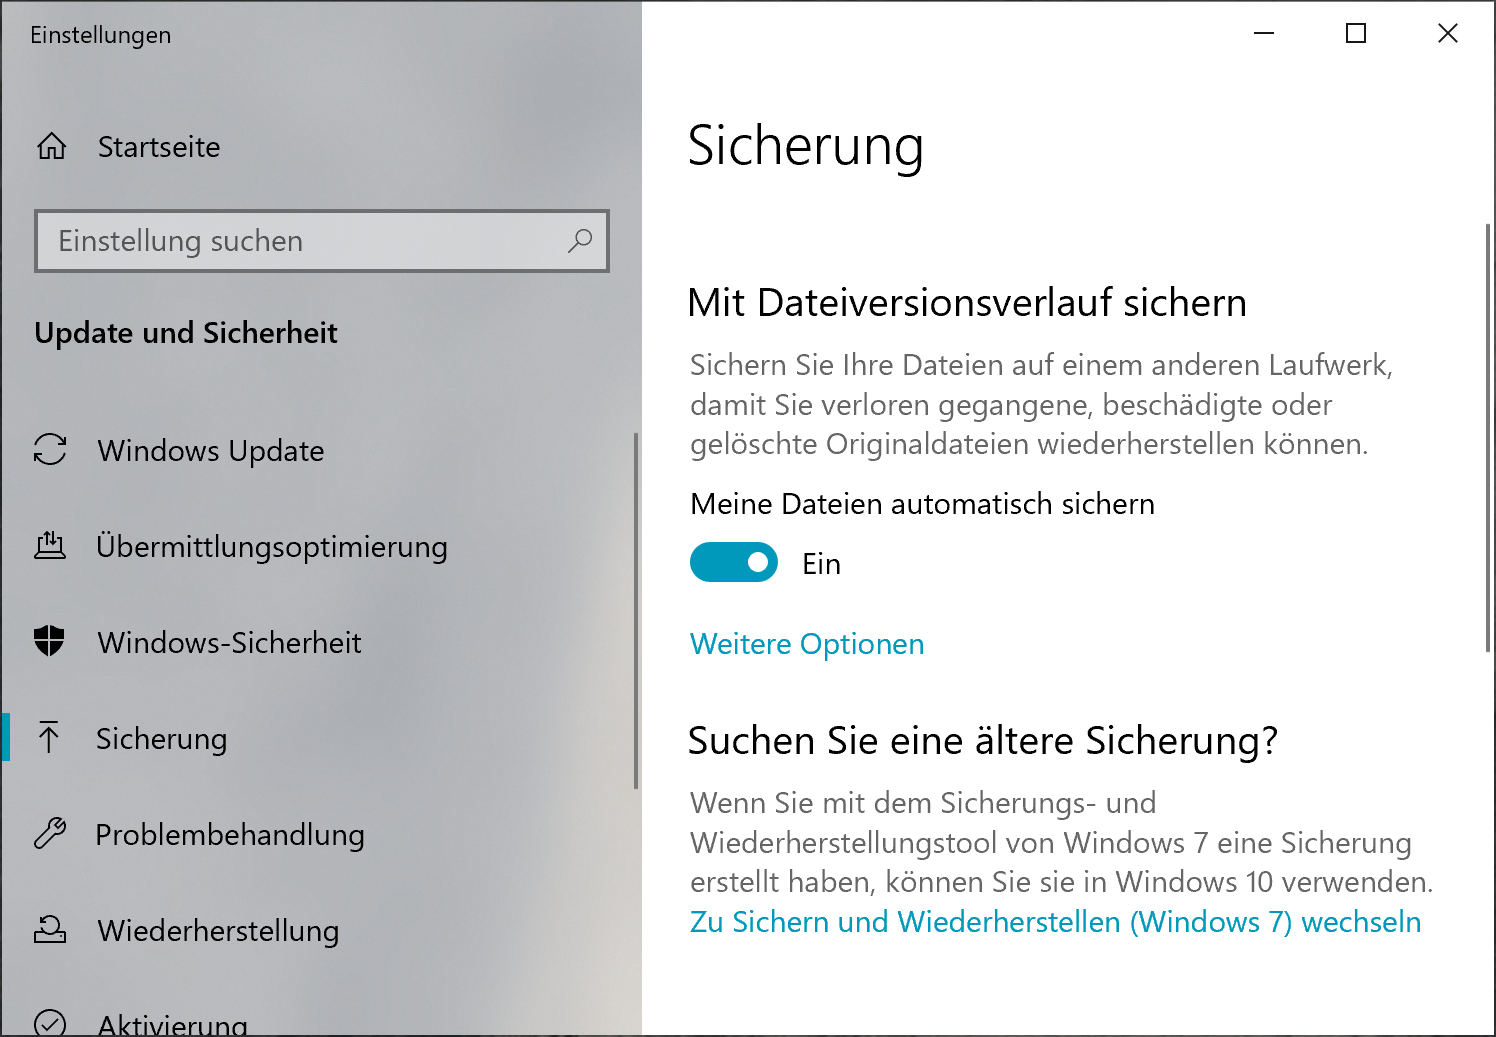
It turns out that this feature is somewhat deprecated and hidden; its code was evidently last touched in the days of Windows 7. It is hidden in the “Backup” tab of the system settings under the heading “Searching for an older backup?”:

Backup Settings
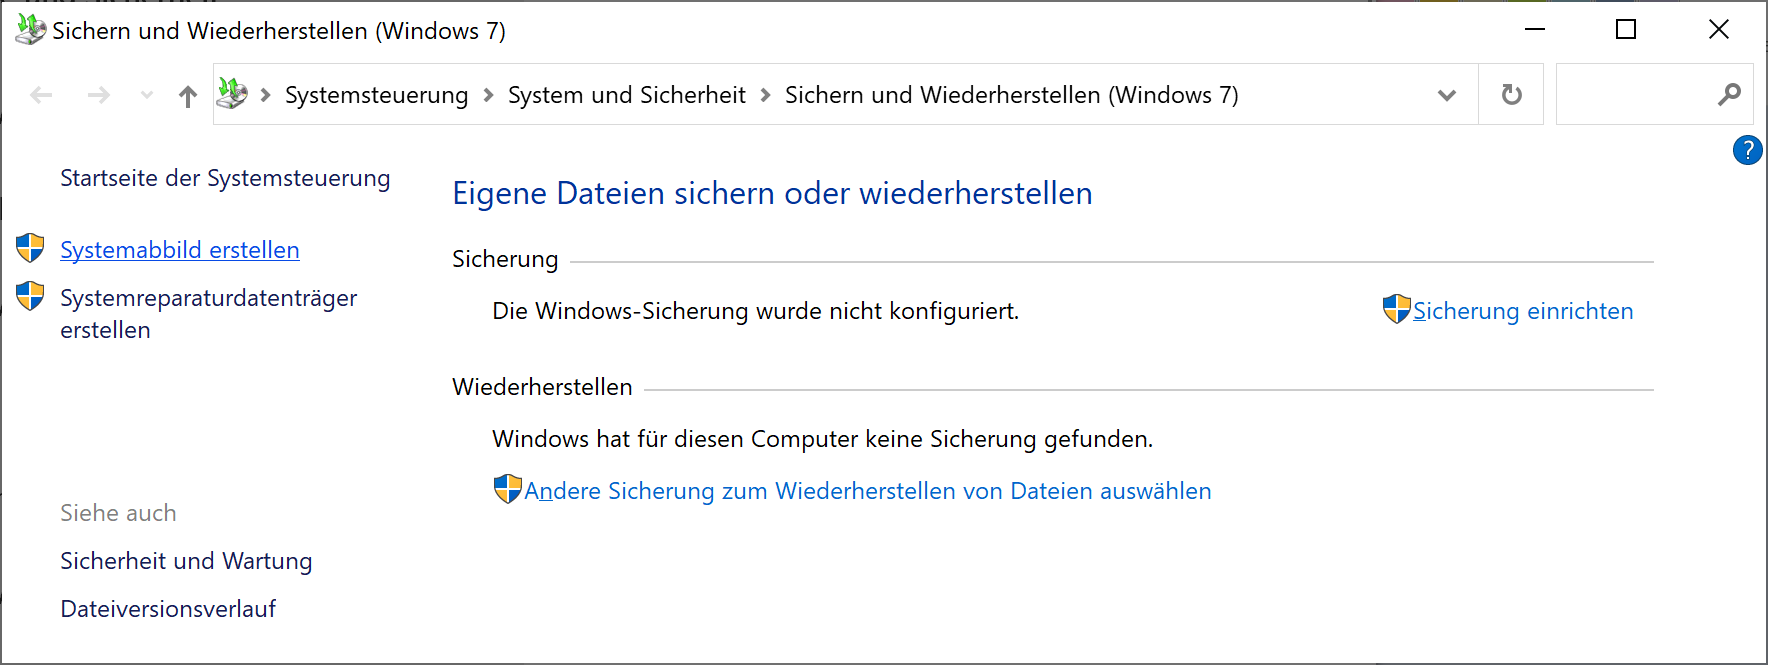
Once there, hit the “Create system image” link on the top left:

Link @ top left
Now, when it came time to restore the image to the new disk, I learned something important about the process:
You cannot restore to a different disk if the original disk is also present.
This means that you must disconnect the old drive first. Before we come to the other thing I learned, we need to talk about partition tables and (dual-)booting.
EFI, GPT, MBR, GRUB, etc.
In modern PCs, there are two fundamentally different ways to partition the boot drive and to boot the system:
MBR and BIOS: there is a “classic” partition table (also called an MBR partition table). It has space for four entries (“primary partitions”). One of these may be an “extended partition” that can contain further partitions. The first 512 bytes on the drive, the Master Boot Record, contain the start of the bootloader. The bootloader is executed in real mode, which means that your modern CPU pretends it is an 8086 from roughly 1982. In this scheme, NetBSD uses a single partition and places a disklabel at the start. Then, the partition can be further subdivided through the entries in the disklabel.
GPT and UEFI: UEFI, the Universal Extensible Firmware Interface, is a
modern-ish standard for writing bootloaders and such. Contrary to the BIOS,
it offers modern features such as 32- or 64-bit addressing on the CPU. The
partition table format used for UEFI booting is called GPT (GUID partition
table, where GUID is a Globally Unique Identifier). GPTs are also more
modern. They have space more entries (often 128) and no longer use the
obsolete cylinder/head/sector addressing. Each partition has a type, a UID
and optionally a label – a name that you choose and that you can use to
identify the partition in /etc/fstab and elsewhere. The bootloader is on a
partition of type “EFI System”, formatted with a vFAT (“msdos”) file system.
Of note is that UEFI and GPT are used on other platforms as well: For instance, modern ARM systems (such as the Pinebook Pro) have a UEFI bootloader and use GPT partitioning. There are also some MIPS systems using UEFI, and more. Depending on the age of the PC, there is either a choice between BIOS and UEFI boot, or UEFI is mandatory. –
My PC is from 2016, so both ways are supposed to work. In my old setup, I
used GRUB (the GRand Unified Bootloader) to show a boot menu and boot either
Windows or NetBSD, using its i386-pc architecture, i.e. BIOS boot.
To set up a GRUB partition, I booted from a grml.org Linux live system and
ran the grub-install command, after creating and mounting a Linux MBR
partition. To my surprise, it defaulted to a UEFI version of GRUB. Thus, I
re-did the partitioning using a GPT (through cgdisk) and installed GRUB:
mkfs.msdos /dev/nvme0n1p1
mount /dev/nvme0n1p1 /mnt
grub-install --efi-directory=/mnt /dev/nvme0n1
Rebooting gave me a GRUB shell in a tiny, barely readable font on my 4K screen. Surprise: Manually booting NetBSD resulted in an error message
No suitable video mode found. Booting in EFI blind mode.
And there was no more console output from NetBSD. If someone reading this article knows how to fix this, I would be glad for a tip :)
One Windows restore later …
Next, I booted from the Windows install / rescue stick. In the second screen, I selected “Repair your computer”, then “System Image Restore”.
Keeping in mind that the image was created on a system with BIOS boot, I was nonetheless surprised at what happened to the drive:
- The GPT partition table was gone, instead there was an MBR partition table.
- Windows reserved three out of four primary partition entries for itself
(system,
C:and a hidden “rescue” partition). The EFI partition was moved, no longer mountable and turned into a0x83(Linux) partition type. - Reset boots straight into Windows.
- My favorite dysfunction: The rescue and Linux partition were relocated to
the start of the free space, preventing extending the
C:drive with the free space – the very reason I had gone through all this hassle.
I fixed the latter issue by deleting and recreating the GRUB partition (see below) as well as moving the Windows “rescue” partition thing using gparted on grml.
GRUB install the second
This time, I created a new primary partition (entry #4) of type 0x83
(Linux), formatted it as ext2 and installed GRUB:
mke2fs /dev/nvme0n1p4
mount /dev/nvme0n1p4 /mnt
grub-install --boot-directory=/mnt --target=i386-pc /dev/nvme0n1
At this point, I also populated /mnt/grub/grub.cfg with the contents of the
boot menu.
And this actually worked!
Addendum: Now, Windows no longer shuts down correctly, no idea what’s up *with that. Rebooting does the right thing though.